Mechanical Chirstmas Tree
May 2024
After 3 years of absence (2020, 2021, 2022), finally students of Mechanical Engineering Department of University of Sumatera Utara organize a Christmas again.
When it comes to Mechanical Engineering Department Christmas, decoration is one of the top priority of the event, more specifically the Christmas tree. It is because the Christmas Tree will be display on the side of the stage, everybody will be able to see it through out the vent.
Besides, building the Christmas Tree can be an opportunity for us as students to apply our engineering knowledge into real engineering project/product.
There are some aspect of engineering we need to use in this project, such as design, simulation, welding, assembling, electronics, software and programming.
For this project I was asked to do the electronics/programming side of things, which to build the Christmas Tree lights controllers. Because the needs for lights decoration for the Christmas Tree is specific to the design of the tree.
So in this post I want to share the process of building Christmas Tree lights controller.
Table of Contents
Lights Configuration
The tree lighting was divided to 2 main parts, body and star section. Body section is made up of by 6 spiral that go from the bottom of the tree all the way up to the top.
Each of this spiral has 4 rolls (6 meters) of RGB LED strip. Beside the spirals, the tree body also has one roll (5 meters) of RGB LED strip spiralling on its main shaft, and for the star section require around +- 4 meters RGB LED strip.
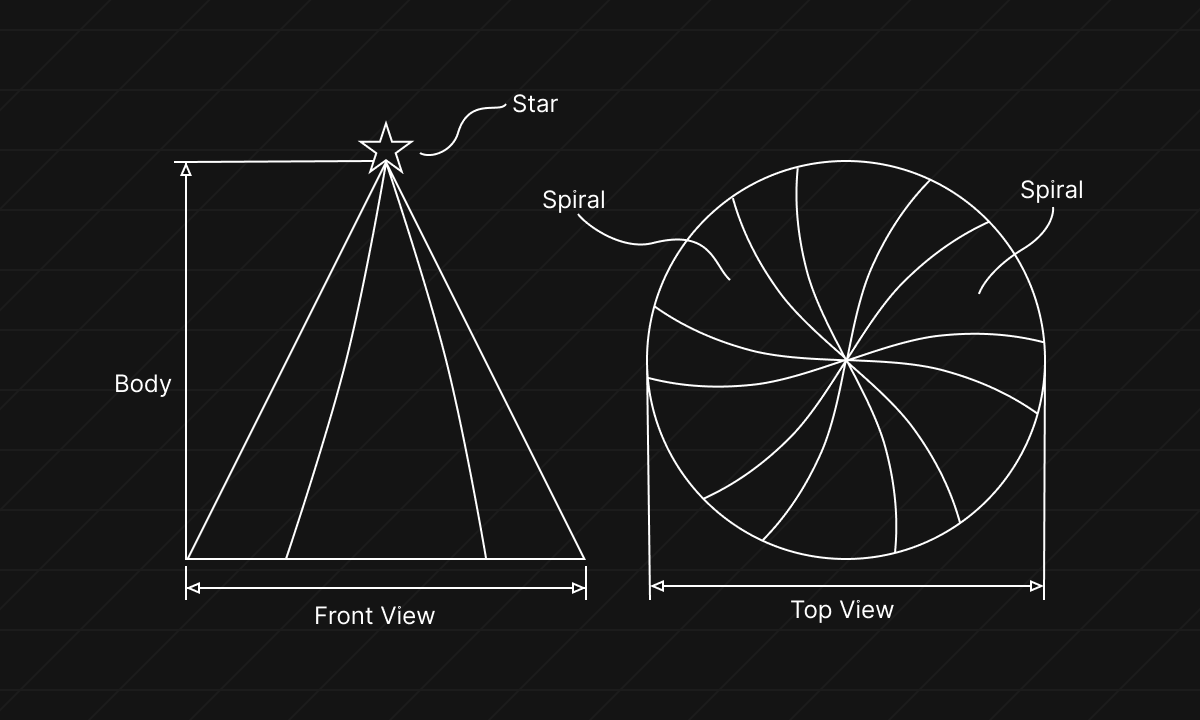
Figure 1. Lights Configuration
Electrical Parts
There are a quite some of electrical parts needed to build this application, here is the electrical/electronic parts use in this application:
- 1. Arduino Mega
- 2. Arduino Nano
- 3. NodeMCU
- 4. Mosfet driver module
- 5. 12V RGB LED strip
- 6. 5V RGB LED strip
- 7. 12V power supply
- 8. 5V power supply
RGB LED Strip
In this application we are using two types of RGB LED strip. 12V RGB LED strip and 5V addressable RGB LED strip.
12V RGB LED strip is around +- 6 meters long, consume around 12 watts power for white colour. It cost Rp. 25000 per each roll. It is cheap and consume little amount of power, but of course has less brightness compare to other 12V RGB LED strip and easily broken, hence its cheapness. This RGB LED is not the first choice for this tree application but we decide to use it for reason I'll explain later.
5V Addressable RGB LED strip is around +- 5 meters long, consume around 18 watts of power per meter. This addressable RGB LED Strip is more powerful than the 12V one. This RGB LED Strip is quite expensive, cost around RP. 150000 per roll. It's expensive because we can control each individual of RGB LED, allowing use to produce variety of RGB lights animation.
Micro-controllers
Micro-controller is use to control the RGB LED Lights, the body section lights is control by Arduino Mega, and with the help of NodeMCU to change its lights mode from remote dashboard. Star section controlled by Arduino Uno. Most micro-controller is operate with voltage around 3 to 5V DC, so it won't actually able to control RGB LED lights that operate at 12V DC. So we need a driver that sit between the micro-controller and the RGB LED strip.
Mosfet Driver Module
Mosfet driver module is an electronic components that provide a way to drive/control a much higher voltage components, in this case RGB LED Strip, using low voltage signals from microcontroller. You can see it how it use as a bridge between the led lights and the microcontroller and act as a 'switch' in this below playgorund.
Mosfet driver module is also work as a way to control the led lights brightness (dimmer) by generating a pulse width modulation from the micro-controller to set the mosfet driver voltage output.
Controller Design
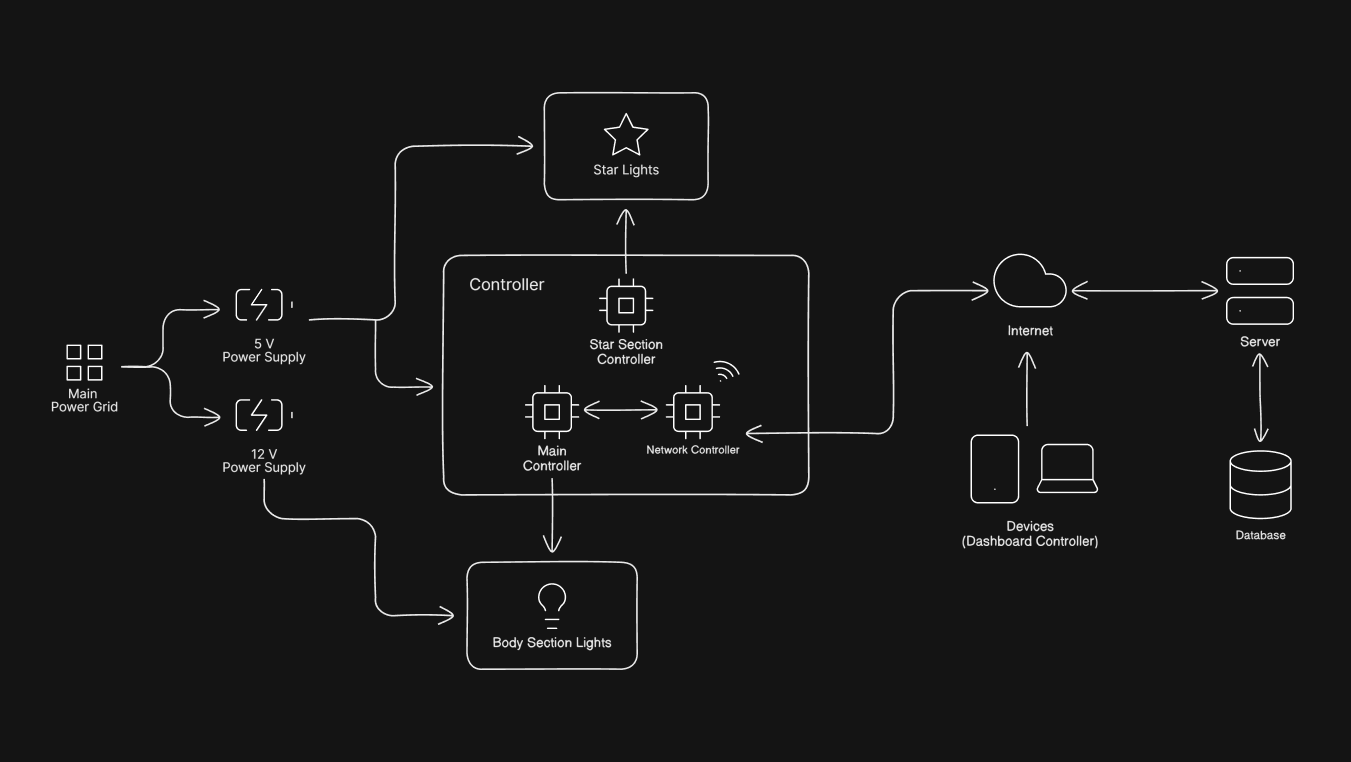
Figure 2. System Diagram
As you can see from the picture above, body and star has different controller. Star led lights has 4 different modes that running in constant loop. Body section led lights has 9 lights modes that can be remotely change using a devices with internet access. The networks controller (NodeMCU) listen to the server for lights mode changes.
When a change of mode sent from a dashboad controller (mobile/desktop website), the NodeMCU will receive the data and send it to the body section controller (Arduno Mega) using serial communication.

Figure 4. Controller Dashboard
When a user click one of a color mode button, it trigger an event listener that update light mode state of the Christmas Tree.
// Dashboard Program
const colorModeButtons = document.querySelectorAll(".color-mode-button")

colorModeButtons.forEach((button) => {
    button.addEventListener("click", () => {
        set(ref(db, "mode"), `${button.dataset.mode}`) // Update the light mode in the database
    })
})
As the change of light mode happened, network controller also listen to the change of light mode and immediately notify. After receiving the new light mode, network controller send its data to the main controller through serial communication. Here is how the main controller parse light mode data.
// Format of data being sent:
// %<mode_number>\n, ex: %1\n (mode 1), %2\n (mode 2).
// % and \n use to know when to parse the serial data
uint8_t read_mode() {
    String mode = "";
    while (Serial1.available() > 0) {
        if(char(Serial1.read()) == '%') {
            mode = Serial1.readStringUntil('\n');
            break;
        }
    }
    return mode.toInt();
}
Then the number is use to call a function that change the lights mode.
// Main Controller Program
uint8_t  led_red_driver = 2;
uint8_t  led_green_driver = 3;
uint8_t  led_blue_driver = 4;
uint8_t  mode = 1; // default mode is 1

void setup() {
    Serial.begin(9600);
    pinMode(led_red_driver, OUTPUT);
    pinMode(led_green_driver, OUTPUT);
    pinMode(led_blue_driver, OUTPUT);
}

void loop() {
    Serial.println(read_mode());
    switch(mode) {
        case 1:
            rgb_sequantial();
            break;
        case 2:
            red();
            break;
        case 3:
            green();
            break;
        case 4:
            blue();
            break;
        // And so on
    }
}

// Mode Function Example
void rgb_sequantial() {
    while(mode == 1) {
        /*
            Do light animation
            Put your Code for animation here
        */
        read_mode(); // To keep track of mode change
    }
}
The reason I was using internet as its remote control protocol instead of Bluetooth or other methods was because I already familiar with this method so less prone to errors.
Internet based protocol is also convenience because people will be able to change lights mode from far away (even people in different continent) as long as the network micro-controller connected to internet (WIFI) and the person has access to the webiste dashboard.
The Struggle
Building the Christmas tree lights wasn't an easy task, there were a lot of obstacle along the way.
LED rgb strips we were originally planned to use were running out of stock, and Medan is not a friendly place when it come to electronics component resources. So we ordered a bunch of led rgb strip from online store in Surabaya.
We purchased around 27 rolls led rgb strip 5050 SMD 12v, but the package arrived with different type of led strip (only white). We were scammed!
We running out of time so we compromised by using another sets of led rgb strips, it was cheap but obviously has a very low quality. There is a store in Medan that sell a lot of this type of led but due to its bad quality a lot of it are broken, and also make the led installation to the tree become harder and time consuming.
We ended up installing the entire led lights on the day of the event, thankfully it was done right before the event start.
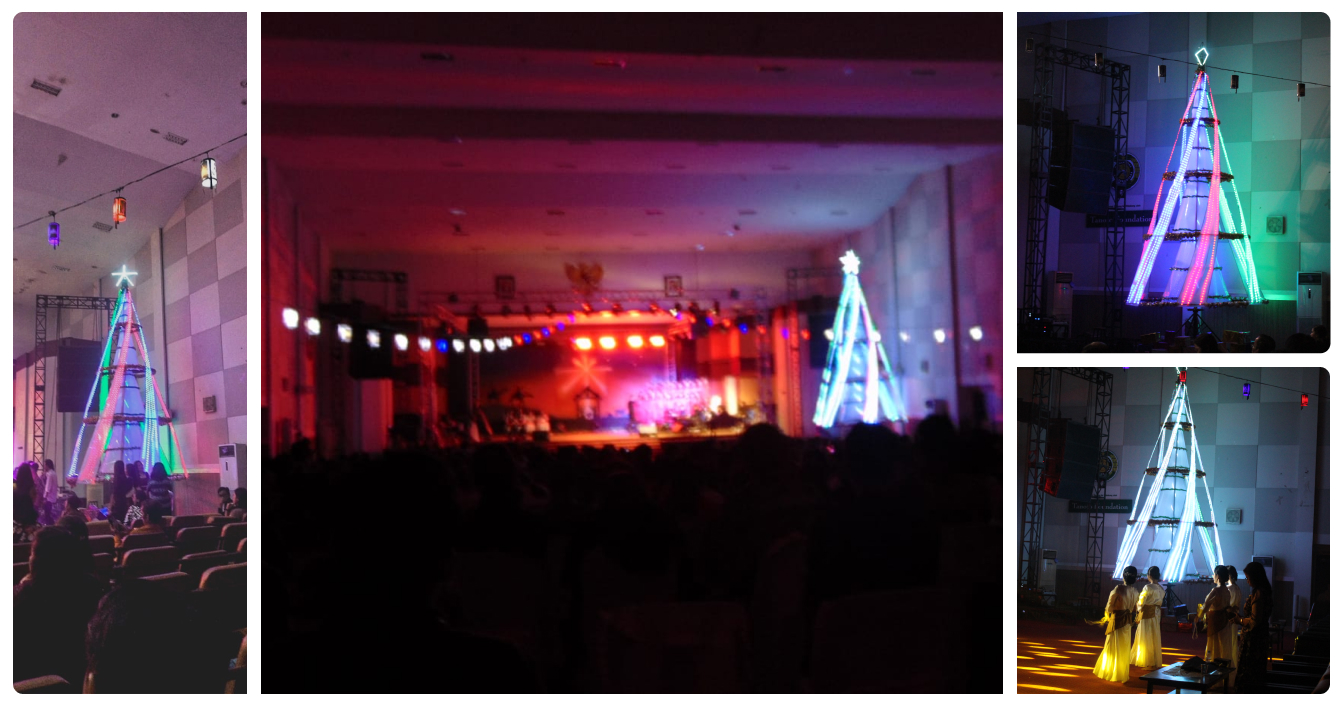
Figure 5. Christmas Tree Collage
The led and the controller work properly throughout the event, it was not perfect, it wasn't what we were originally planned, but it get the job done.